
Arduino入門2——串口驅(qū)動函數(shù)及用法
上期,我們簡單的認識了一下Arduino,淺淺的入了個門,這一期我們介紹以下Arduino串口常用的函數(shù)及用法
1.IO
常用串口庫函數(shù)如下:
| 函數(shù)名 | 用法及解析 |
|---|---|
| pinMode() | 用于IO口初始化 |
| digitalWrite() | 對IO口寫入高低電平 |
| digitalRead() | 讀取IO口的高低電平 |
| analogReference() | 配置AD采集的參考電壓 |
| analogWrite() | 對應(yīng)IO口實現(xiàn)AD轉(zhuǎn)換,精度可達10位 |
| analogRead() | 對應(yīng)IO口實現(xiàn)DA轉(zhuǎn)換,精度為8位 |
下面是對應(yīng)的一些用法:
-
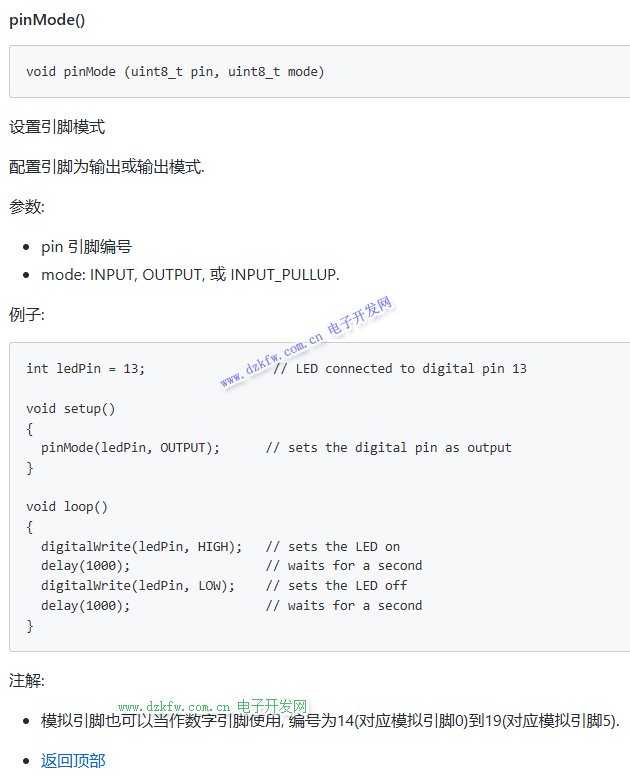
pinMode()
-
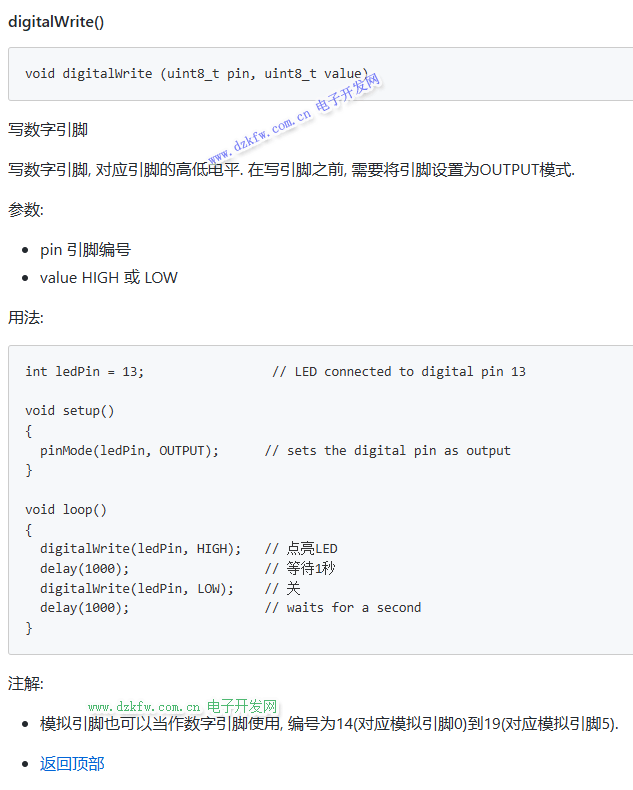
digitalWrite()
-
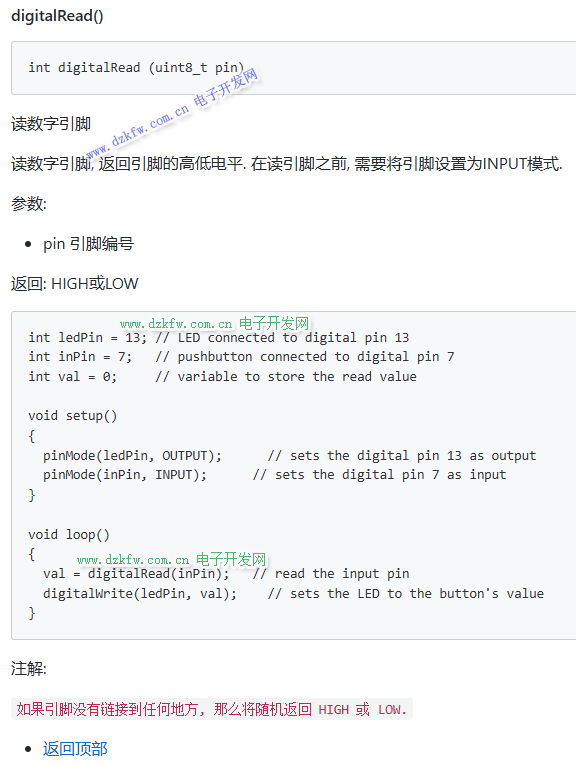
digitalRead()
-
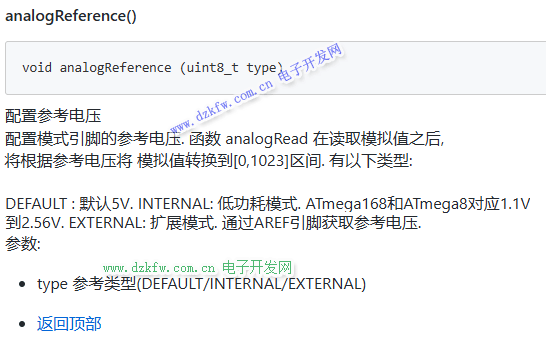
analogReference()
-
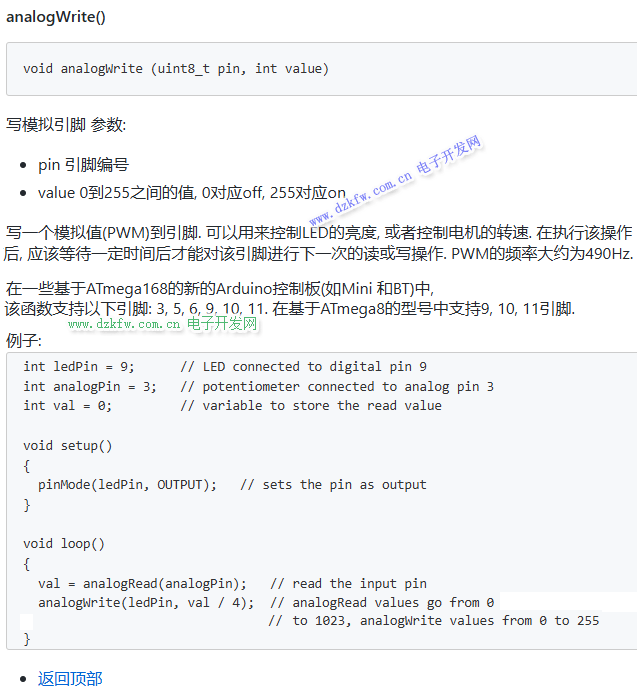
analogWrite()
-
analogRead()

2.串口
常用串口庫函數(shù)如下:
| 函數(shù)名 | 用法及解析 |
|---|---|
| Serial.begin(9600) | 用于串口初始化,參數(shù)為波特率 |
| Serial.print(val,fromat) | 串口輸出函數(shù),val為輸出的內(nèi)容,fromat為輸出格式,可以省略,省略時默認為十進制 |
| Serial.println(val,fromat) | 串口輸出函數(shù),相對于Serial.print的區(qū)別是自帶換行 |
| Serial.write(val) | 串口輸出函數(shù),發(fā)送單個字節(jié)或字符串 |
| Serial.available() | 用于檢測串口是否接收到數(shù)據(jù),返回值為讀取數(shù)據(jù)的長度 |
| Serial.read() | 串口讀取函數(shù),每次讀取一個字節(jié)并返回,當(dāng)串口沒有接收到數(shù)據(jù)時,返回-1,讀取完數(shù)據(jù)后,下次調(diào)用會讀取下個字節(jié) |
| Serial.parselnt() | 串口解析函數(shù),用來讀取接收到的數(shù)據(jù)中的整數(shù),在讀取到整數(shù)后讀取到字符會停止,讀取后緩沖區(qū)內(nèi)的內(nèi)容會被清除。比如讀取的內(nèi)容為123adc456,則需要讀取兩次,第一次讀取到123.第二次讀取adc456,但由于adc為字符,所有只讀取456。 |
| Serial.parseFloat() | 也是串口解析函數(shù),用來讀取小數(shù) |
下面是對應(yīng)的一些用法:
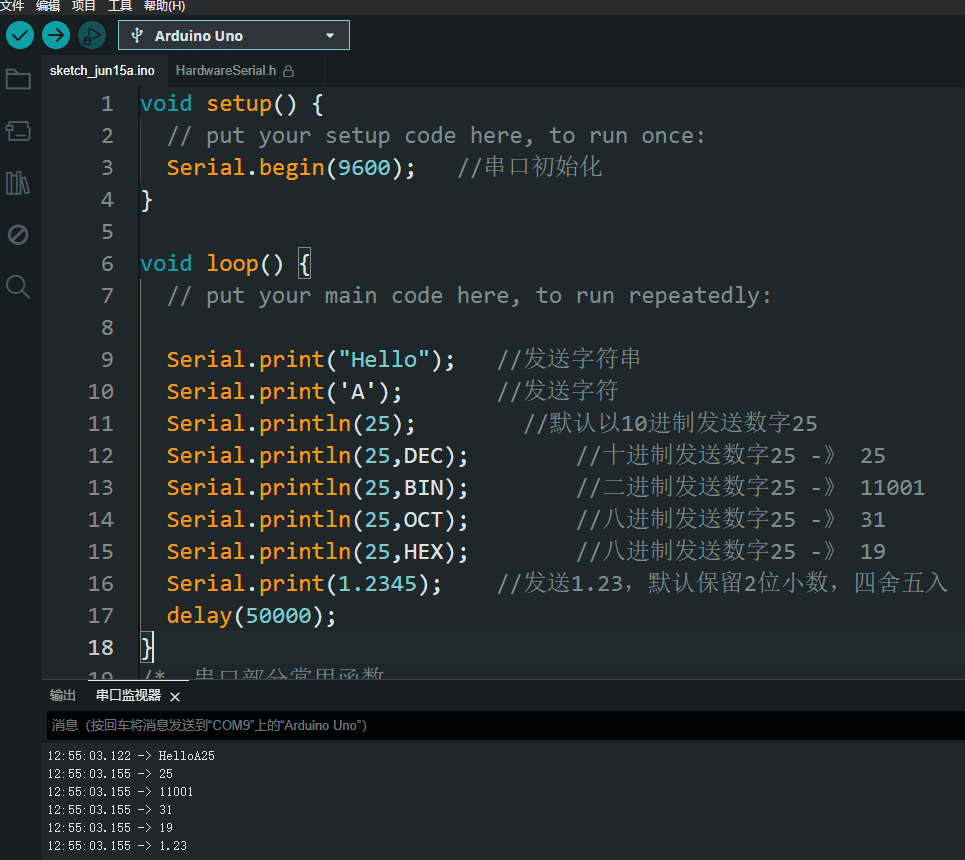
- 示例1:
void setup() {
  // put your setup code here, to run once:
  Serial.begin(9600);   //串口初始化
}
void loop() {
  // put your main code here, to run repeatedly:
  Serial.print("Hello");   //發(fā)送字符串
  Serial.print('A');       //發(fā)送字符
  Serial.println(25);        //默認以10進制發(fā)送數(shù)字25
  Serial.println(25,DEC);        //十進制發(fā)送數(shù)字25 -》 25
  Serial.println(25,BIN);        //二進制發(fā)送數(shù)字25 -》 11001
  Serial.println(25,OCT);        //八進制發(fā)送數(shù)字25 -》 31
  Serial.println(25,HEX);        //八進制發(fā)送數(shù)字25 -》 19
  Serial.print(1.2345);    //發(fā)送1.23,默認保留2位小數(shù),四舍五入
  delay(50000);
}
- 結(jié)果1:
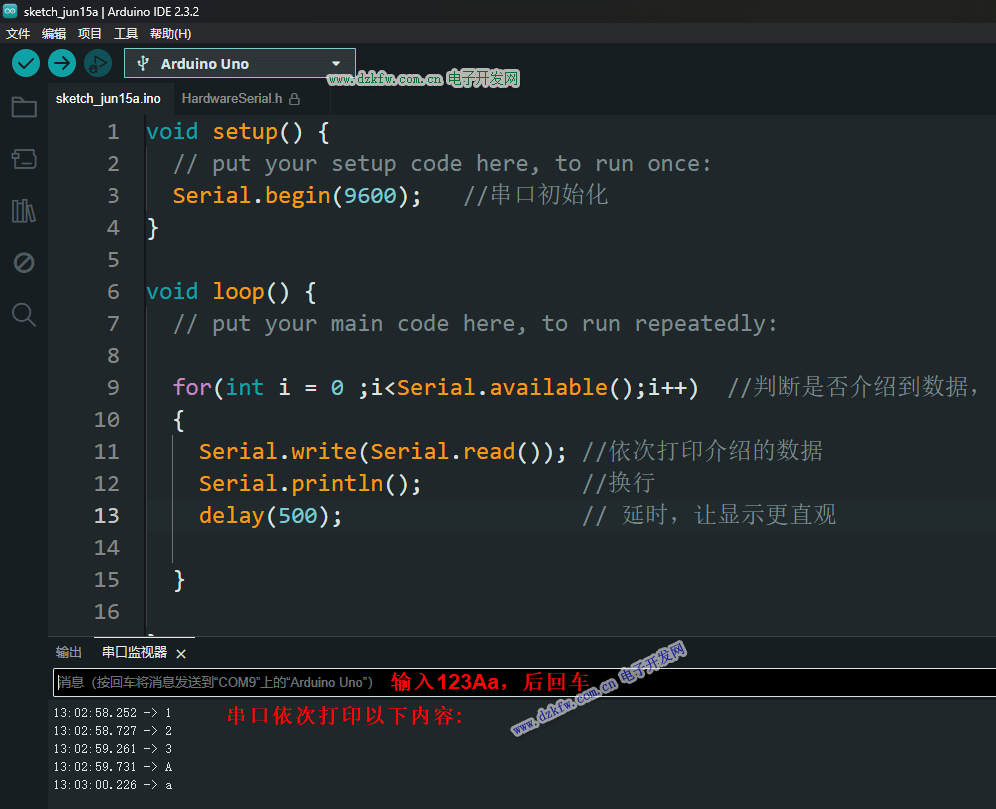
- 示例2:
void setup() {
  // put your setup code here, to run once:
  Serial.begin(9600);   //串口初始化
}
void loop() {
  // put your main code here, to run repeatedly:
  for(int i = 0 ;i<Serial.available();i++)  //判斷是否介紹到數(shù)據(jù),
  {
    Serial.write(Serial.read()); //依次打印介紹的數(shù)據(jù)
    Serial.println();            //換行
    delay(500);                  // 延時,讓顯示更直觀
  }
}
- 結(jié)果2:
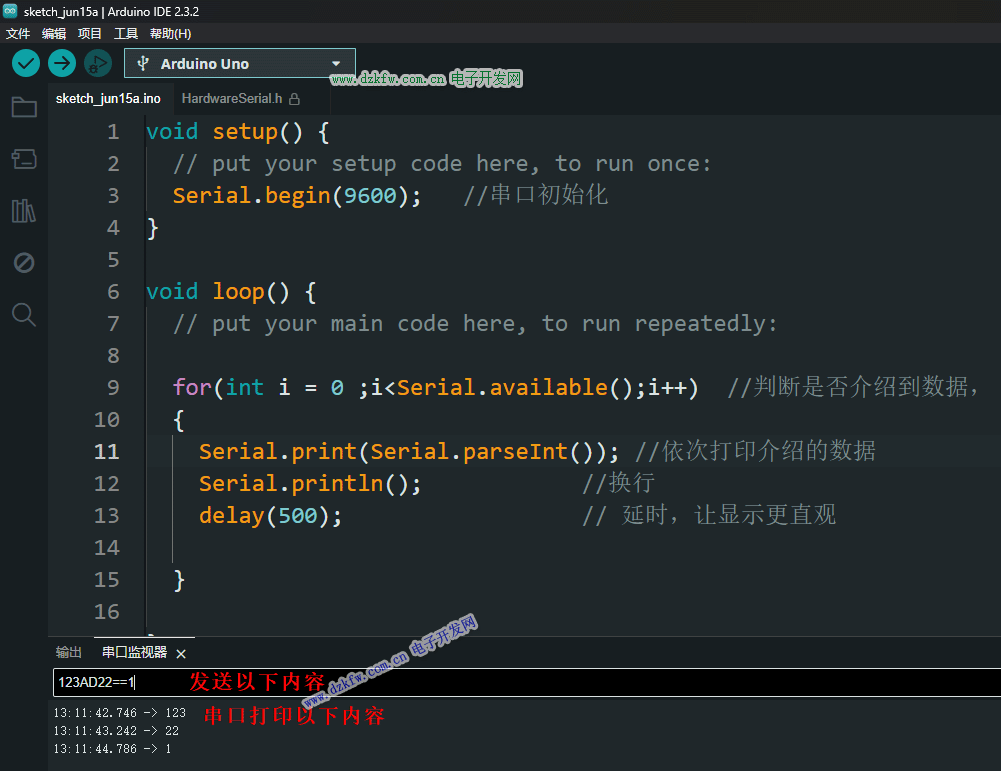
- 示例3:
void setup() {
  // put your setup code here, to run once:
  Serial.begin(9600);   //串口初始化
}
void loop() {
  // put your main code here, to run repeatedly:
  for(int i = 0 ;i<Serial.available();i++)  //判斷是否介紹到數(shù)據(jù),
  {
    Serial.print(Serial.parseInt()); //依次打印接收的整數(shù)
    Serial.println();            //換行
    delay(500);                  // 延時,讓顯示更直觀
  }
- 結(jié)果3:
- 建立開發(fā)板與電腦串口連接,像電腦發(fā)送姓名、年齡、身高等信息
//1. 建立開發(fā)板與電腦串口連接,像電腦發(fā)送姓名、年齡、身高等信息
void setup() {
  // put your setup code here, to run once:
  Serial.begin(9600);
}
void loop() {
  // put your main code here, to run repeatedly:
  Serial.write("naem: 不想寫代碼的我");
  Serial.println();
  Serial.write("age: 18");
  Serial.println();
  Serial.write("height: 180");
  Serial.println();
  delay(1000);
}
- 實現(xiàn)通過串口監(jiān)視器給開發(fā)板發(fā)送信息,在把接收的信息發(fā)送回去
//實現(xiàn)通過串口監(jiān)視器給開發(fā)板發(fā)送信息,在把接收的信息發(fā)送回去
void setup() {
  // put your setup code here, to run once:
  Serial.begin(9600);
}
void loop() {
  // put your main code here, to run repeatedly:
  for(int i =0; i<Serial.available();i++)
  {
    Serial.write(Serial.read());
    Serial.println();
    delay(500);
  }

}
- 實現(xiàn)加法計算器
//實現(xiàn)加法計算器,
int Add(int a,int b)
{
  Serial.print(a);
  Serial.print('+');
  Serial.print(b);
  Serial.print('=');
  Serial.println(a+b);
 return a+b;
}
void setup() {
  // put your setup code here, to run once:
  Serial.begin(9600);
}
void loop() {
  // put your main code here, to run repeatedly:
  if(Serial.available())
  {
    Add(Serial.parseInt(),Serial.parseInt());
  }
3.中斷
常中斷函數(shù)如下:
| 函數(shù)名 | 用法及解析 |
|---|---|
| attachInterrupt() | 中斷開啟函數(shù) |
| digitalPinToInterrupt() | 獲取對應(yīng)引腳中斷號的函數(shù),返回值為中斷編號 |
| detachInterrupt() | 關(guān)閉引腳對應(yīng)的中斷 |
下面是其對應(yīng)的用法:
/*
attachInterrupt()中斷開啟函數(shù),
第一個參數(shù)是開啟的中斷號,不同引腳、不同開發(fā)板對應(yīng)的中斷號不同,這一點需要注意
第二個參數(shù)是對應(yīng)中斷的服務(wù)函數(shù),需要自己定義,必須是無參數(shù)無返回值類型
第三個是中斷的觸發(fā)方式,一個四種:LOW,低電平觸發(fā);CHANGE,電平變化觸發(fā);FALLING,下降沿觸發(fā);RISING,上升沿觸發(fā);
此外,還有一種觸發(fā)方式,HIGH,只有 Due, Zero and MKR1000這些板子支持。
注:不同開發(fā)板引腳與中斷號對應(yīng)如下:
 中斷號:     0       1     2     3     4     5
  UNO       引腳2    3
  Mega2560  引腳2    3     21    20    19     18
  Leonardo  引腳3    2     0      1
  Due       ------------所有IO口----------------
digitalPinToInterrupt(pin):獲取對應(yīng)引腳中斷號的函數(shù),返回值為中斷編號
detachInterrupt(pin);關(guān)閉引腳對應(yīng)的中斷,一般不常用
*/
int i = 0;
void setup() {
  // put your setup code here, to run once:
  pinMode(LED_BUILTIN,OUTPUT);       //設(shè)置LED輸出模式
  pinMode(2,OUTPUT);                // 定義引腳2,作為輸入,將引腳2和引腳3通過杜邦線相連,通過對引腳2寫入數(shù)據(jù)觸發(fā)引腳3的中斷
  digitalWrite(2,LOW);              //設(shè)置引腳2初始電平為低電平
  digitalWrite(LED_BUILTIN,LOW);    //熄滅LED
  attachInterrupt(digitalPinToInterrupt(3),function,CHANGE);  //開啟引腳3對應(yīng)的中斷

}
void loop() {
  // put your main code here, to run repeatedly:
  i++;
  digitalWrite(2,i%2);  //通過i的值,改變引腳2,進而改變引腳3的電平,使其產(chǎn)生中斷
  delay(500);           //每500ms產(chǎn)生一次中斷
}
void function()
{
  digitalWrite(LED_BUILTIN,i%2);    //閃爍LED。
}
 返回頂部
返回頂部 刷新頁面
刷新頁面 下到頁底
下到頁底